Showing posts with label Teknologi Maklumat. Show all posts

Monday, March 04, 2024

Format Untuk Letak Kod Sumber dalam Blog

Cara Memformatkan Kod Sumber dengan Nombor Baris di Blogspot

Cara Memformatkan Kod Sumber dengan Nombor Baris di Blogspot

Untuk memformatkan kod sumber dengan nombor baris di Blogspot, anda boleh menggunakan SyntaxHighlighter. Ikuti langkah-langkah di bawah untuk melakukannya:

  1. Buka entri blog baru atau sedia ada di Blogspot.
  2. Pilih mod penyuntingan HTML di dalam editor entri blog.
  3. Letakkan kod sumber anda di dalam tag <pre> dan <code>.
  4. Tambahkan kelas CSS "brush: [language]" di dalam tag <pre> untuk menandakan bahasa sumber kod anda.
  5. Tambahkan kod JavaScript untuk mengaktifkan "SyntaxHighlighter" di dalam entri blog anda.
  6. Simpan dan terbitkan entri blog anda.

Contoh Kod Sumber


// Ini adalah contoh kod JavaScript

function greet() {

    console.log("Hello, world!");

}

greet();

Tuesday, March 14, 2017

MySQL Command Line Untuk Backup/Restore

Ntah berapa kali guna web untuk backup kadangkala banyak halangan dan membuat perasaan yang membengangkan so kembali ke zaman porba kala kita gunakan command line. Cuba korank try syiok gak backup MYSQL.

Single databases : korank gunakan command mysqldumb macam kat bawah ni
mysqldump database_name > database_name.sql
Multiple databases korank gunakan untuk multiple databse sekali backup
mysqldump --databases database_one database_two > two_databases.sql
Dengan kod ni korank akan backup 2 DB dalam satu sql statement , jadi bila korank run sql ni , ia akan create 2 DB sekaligus.
Kalau korank nak cepat gunakan command kat bawah ni, backup semua skali ... ha ha ha senang je.
mysqldump --all-databases > all_databases.sql
Restore Balik Backup MYSQL
Dah korank backup so kena la reatore balikkan. Jadi just bagitau je mysql apa yang direstore.
mysql database_name < database_name.sql
Seperti biasa kalau nak cepat gunakan command ajaib yang ada perkataan all. ATau korank boleh gak tarik single DB dengan gunakan macam kat bawah ni.
mysql --one-database database_name < all_databases.sql

Wednesday, January 06, 2016

Systemanalyse und Programmentwicklung (SAP)

Pengenalan
SAP (Systemanalyse und Programmentwicklung) dalam bahasa jerman atau (Sistem Analisis dan Program Pembangunan adalah merupakan Sistem Enterprise Resource Planning (ERP)  yg dapat mengintegrasikan seluruh proses perniagaan secara realtime. Ianya :-
  • Modul-modul dalam SAP boleh dipecahkan dan digunakan mengikut kesesuaian keperluan organisasi.
  •  Dapat mengabungkan dan mengembangkan semua aplikasi dalam satu persekitaran yang sama,
  • Modul-modul SAP saling berkait dan dapat mengemaskini modul lain apabila terdapat modul lain yg telah dikemaskini.

SAP is a package with minimal customizations and the company implementing the same may have to re-orient its business processes to fall in line with SAP requirements.

Latarbelakang SAP


Kelebihan penggunaan SAP


Penutup


Bagi menggunakan SAP , lesen yang digunakan adalah per user  agak mahal sehingga mencapai jutaan ringgit untuk lesen  sahaja . Kebiasaan SAP digunakan untuk syarikat besar dan multinasional seperti Pertronas dan Hitachi.

Friday, September 11, 2015

Bagaimana Install dan Configure Dradis Framework 2.9

Segala-galanya patut mudah , ntah camner pulak terpaksa install secara manual. Insyallah kalau ada sapa-sapa berjaya tolong update ye.

Standard Operational Prosedur (SOP) kalau guna windows ni semuanya 1 klik je. So benda yang korang nak guna ni biasanya x de kat windows so paham-paham je la. Bukan senang nak senang ye tak. So ini aku punya cara ... Alhamdulillah menjadi , boleh ikut step ini secukup rasa ye ... Chewah macam nak masak je.

Standard Operational Prosedur (SOP)

1. Download installer kat http://sourceforge.net/projects/dradis/
2. Lepas tu klik je installer tu ... Siap dah ... keh keh keh ...

Owh aku nya tak berjaya so kena wat cara manual.

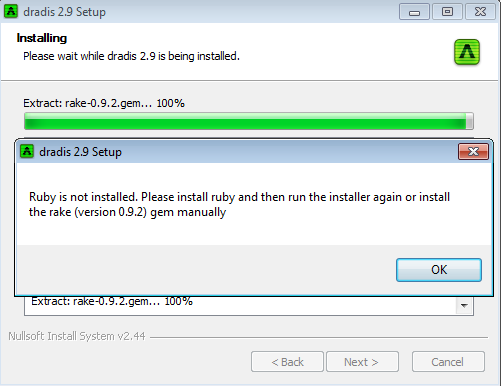
3. Lepas install mmg akan kuar error camni ... bagusnya korang belajar la dari situ cam aku ni ... tapi aku nak wat mudahkan korang ... aku tolong buat ok ... nanti korang like aku tau ...


Keh ... keh .. keh banyakkan ... Adoyai hampir putus harapan aku. tapi dari error ni aku pun belajar la ... then skang share plak dengan korank sbb dah try cari camner ... kat Pakcik Google tapi x jumpa.

4. Seterusnya cari path kat ner korang install dradis tadi .. kalau perasan masa memula korang klik install dia ada tanya ... cth:


5. Kita install la secara manual Ruby Installer http://dl.bintray.com/oneclick/rubyinstaller/rubyinstaller-1.9.3-p551.exe make sure tick semua yang ada masa akhir installation.

6. Ruby Development Kit pun kena download http://dl.bintray.com/oneclick/rubyinstaller/DevKit-tdm-32-4.5.2-20111229-1559-sfx.exe dan extract ke tempat yang sama korank install dradis kat step 4 tadi. Korank kena nama folder tu DevKit

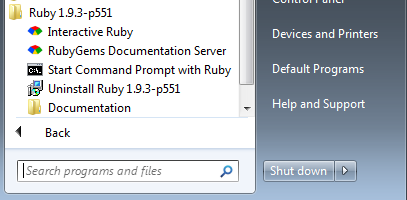
7.  Run Ruby Command Prompt dan masuk ke folder yang korang install tadi 


yang ni kena pandai command line la sket ... kalau dah manual ni banyak la korank kena guna commandline iaitu cd\ [folder dradis] macam akunya kat atas tu . OK

8. Lepas dah masuk .. korank settle bundle untuk compile server type gem install bundle lepas tu nanti run reset.bat

9. nak run server dradis tu korank run server.bat tapi pastikan kat directory yg betul ... nak senang buat shortcut kat desktop.

Sekian dulu ... kalau ada apa2 yg kurang ... nanti boleh komen ok ... Bye ..  Bye loh ...

* yang merah tu korang kena la type kat commandline tau ... jangan guna windows explorer untuk run ... :0 

Advance Setting

Klu korang nak jadikan pc korank tu server untuk share dengan kengkawan hakes korang ... untuk wat information gathering gunakan ini untuk run dradis share ip pc korang

Cth:

run dalam directory korank and ofkos gunakan command line

server -b 192.168.1.108

Kat pc korank dah boleh browse guna 

https://192.168.1.108:3004


Wednesday, June 03, 2015

Mystile: Change Recent Products in Woocommerce


kalau nak tukar recent product kat woocomerce dalam wordpress kena la edit sket function kat dalam coding di

Mystile: theme-woocommerce.php (includes/theme-woocommerce.php)


Caranya :

Dashboard -> Appearance ->Editor -> ->Template ->

theme-woocommerce.php


Bahagian 

function mystile_recent_products() {
global $woo_options;
if (class_exists('woocommerce') && $woo_options[ 'woo_homepage_products' ] == "true" ) {
echo '

'.__('Recent Products-Test', 'woothemes').'

';
$productsperpage = $woo_options['woo_homepage_products_perpage'];
echo do_shortcode('[recent_products per_page="'.$productsperpage.'"]');
} // End query to see if products should be displayed
}

Wednesday, April 08, 2015

Enable and use “ifconfig” in CentOS 7 minimal servers

So dalam CentOS 7 minimal servers command ifconfig x de macamana nak wat ni .. Adoyai.

Korang kena la cari pakej mana yg bagi command ifconfig ni 
command:
yum provides ifconfig
Sample Output:
Loaded plugins: fastestmirror Loading mirror speeds from cached host file * base: mirror.axarva.co.id * extras: mirror.smartmedia.net.id * updates: mirror.poliwangi.ac.id net-tools-2.0-0.17.20131004git.el7.x86_64 : Basic networking tools Repo : @baseMatched from: Filename : /usr/sbin/ifconfig
Atau guna command ni :
yum whatprovides ifconfig
Maka, “provides” or “whatprovides” digunakan untuk mengenalpasti yang mana feature or file yang diperlukan.
Outputnya net-tools package yg mengandungi ifconfig command.
Guna command ni plak untuk install:
yum install net-tools
Jeng .. jeng dah ada command tu.
ifconfig -a

Monday, September 15, 2014

Windows 9 dah datang ... yuhuuu

Amboi la check x sempat nak explore Windows 8 , dah datang windows 9 nak ni. So ni ada sket video Windows 9 yang dibocorkan oleh German blog site WinFuture  . Wah wah hebat depa ni .. ada je maklumat terkini. Cam spy plak ... huhuhuhu

So nampak cam pembaharuan dari segi susun atur Start Menu dan Start Page. So sesiapa yang dah menerai windows 8 pasti teruja nak gunakan feature ni.

Tapi aku plak dah kebingungan cam ne lak gomen nanti , dah user2 masih terkial2 dengan window 8 , windows 7 pun belum habis khatam lagi. Ni x masuk lagi perolehan perisian OS/PC dan sewaktu dengannya. Nak cover PC yang windows XP dah expired pun dah susah hati.

Budget dah susah ... adoyai ... apa-apa hal pun terpaksa orang IT dalam govt kena hadap dulu satgi ada yg advance kami plak yang kena hamput.


Versi padat


Versi Hebat

Redmine - Mobile Setup

Untuk akses dari iPad/iPhone atau Android
Configure
  1. API requires authentication. 
  2. To enable the API-style authentication, 
  3. you have to check Enable REST API in Administration -> Settings -> Authentication

Sunday, September 14, 2014

Ini kisah benar ... siot ...

Adoh hai sejak dua tiga minggu ni dok memikir nasib badan. Stress melampau disebabkan cerita ceriti kat FB dan mediasosial. Kekadang aku rasa x leh g mana dok dalam dunia IT. Tapi dah rezeki .. balun je la. Hahahaha video ni mengambarkan nasib aku ...

Saturday, September 06, 2014

Persediaan Menggunakan Redmine - Part 1

Apabila dah install redmine, kita pun nak cari macammana nak guna redmine ini. Adoi hai ... cari-cari kat Pakcik Googe ... so yang ni saya cuba kongsikan

Pengenalan

Apa itu Redmine daripada http://en.wikipedia.org/wiki/Redmine

Redmine is a free and open source, web-based project management and bug-tracking tool. It includes a calendar and Gantt charts to aid visual representation of projects and their deadlines. It handles multiple projects.

Apakah Redmine itu ?
Redmine adalah aplikasi opensource? yang digunakan untuk membuat pengurusan projek. Dimana didalamnya ada 

aktiviti yang dibuat
masalah yang dihadapi
jangka masa sesuatu isu diselesaikan
forum 
wiki
dsbnya

Oleh itu banyak yang boleh dibuat untuk merancang sesuatu pekara atau projek samada untuk personal , ofis dsbnya.

Setup yang aku buat untuk redmine aku ... so boleh la mencuba , nanti aku share lagi apa yang aku buat ok ye ...

1. Configure rMagick
sudo apt-get install imagemagick libmagickcore-dev libmagickwand-dev
Then,
gem install rmagick
2. Setup Projek
  1. Create Projek
  2. Add User dalam Settings
  3. Kemaskini isu status
    Ini penting untuk memastikan setiap isu boleh dikemaskini status samada new,close dsbnya
    Administration -> Issue statuses -> kemaskini
    • New utk default value apabila create isu baru
    • Reject atau Closed value Issue Closed di tickkan
    • secara default Issue Closed x tick bermaksud ianya isu masih lagi open.

Tuesday, August 05, 2014

Macamana nak Buat Kotak dalam Blog

Eh ... Katak dalam blog , mana ada orang buat kodok kat blog. Bukan lah ni nak wat kotak dalam blog. So bila nak wat kotak untuk command atau coding senang sket nak cut and paste ... hehehehe , selalu macam tu la ... Nak jadi pandai cara mudah ..

So ini yang aku jumpa dan kongsi :-

Langkah-langkahnya
  1. Yup .. sebelum korang boleh buat kena masuk dalam blog post mode (... korang dah tau .. kan ..)
  2. Klik pada  HTML button pada sisi kiri blog 
  3. Disini semua coding blog dalam bentuk asalnya iaitu dalam bahasa HTML (korang x faham korang google la ..)
  4. Copy code kat bawah ni dan paste kat section yang korang nak buat kotak tu.
<div style="background: #f8f8f8 repeat; border-bottom-left-radius: 0px 0px; border-bottom-right-radius: 0px 0px; border-top-left-radius: 0px 0px; border-top-right-radius: 0px 0px; border: 2px solid #222222; padding: 10px;">

 -- Masukan Teks Anda --

 </div>

Keterangan

Warna Background/Latarbelakang Box
style="background: #f8f8f8 <--- boleh diubah sini

Saiz Border
border: 2px <--- semakin besar nombor semakin tebal border

Jenis Border
border: 2px solid <--- bentuk terdiri daripada dotted , dashed , dash-dotted dan solid

Install Server Ubuntu Dalam Vmware

Hari nak kongsi apa yang dah dibuat di agensi , mereka mohon bantuan untuk setup satu virtual server dalam vmware. So alang-alang nak install kat situ ,baik kita berkongsi ilmu :)

1.Pengenalan 
  Vmware
  • Software utk virtual mesin
  •  Fungsi untuk menjalankan banyak OS (guest OS) dalam satu hardware
  • Tiada batasan untuk menjalankan OS melainkan kebergantungan kepada spesifikasi host/server utama
  • Berkonsep optimumkan penggunaan hardware seperti cpu, memory, hardisk dan technology hardware.  
2.Spesifikasi Server Ubuntu

Install Type: Server
RAM: 2GB ram
Hard Drive Space: 10 GB

3.Create vhost dalam vmware
 Cadangan
 ip:- x.x.x.x
Datastore :- SAN/NFS/local ?
Installer:- (dalam storage mana ?)

4.Server OS
Install Ubuntu 12.04 Server LTS

5.Install Webmin (Opensource Web Management - mcm Cpanel tapi free punya)
Go to http://www.webmin.com/tgz.html
Get the latest tar.gz
Command to install Webmin
cd /tmp
sudo wget http://prdownloads.sourceforge.net/webadmin/webmin-1.690.tar.gz
sudo gunzip webmin-1.690.tar.gz
sudo tar xf webmin-1.690.tar
cd webmin-1.690
sudo  ./setup.sh /usr/local/webmin

6.Install Apache, MySQL , PHP

a. To install apache, open terminal and type in these commands:
sudo apt-get update
sudo apt-get install apache2

b. To install MySQL, open terminal and type in these commands:
sudo apt-get install mysql-server libapache2-mod-auth-mysql php5-mysql

c. To install PHP, open terminal and type in this command.
sudo apt-get install php5 libapache2-mod-php5 php5-mcrypt
d. Check php
sudo nano /var/www/info.php
Add in the following line:

// Show all information, defaults to INFO_ALLphpinfo();// Show just the module information.
// phpinfo(8) yields identical results.
phpinfo(INFO_MODULES);?>
Restart apache so that all of the changes take effect:
sudo service apache2 restart

e. Install phpMyAdmin
The easiest way to install phpmyadmin is through apt-get:
sudo apt-get install phpmyadmin

Tuesday, July 15, 2014

Github - Sedia ke Bulan

Memula kita akan create username dan email untuk git. Ini penting sebelum guna git

 git config --global user.name "nama kita" 

oit jangan dibubuh sekali dengan tanda " " tu


Contoh macam ni la:


git config --global user.name teratakbuluh


Ini untuk mengetahui siapa yang meng'commit' sesuatu projek.So nanti kalau dah ramai senang nak tau sapa yang 'commit' dalam projek.


Daftarkan email yang kita signed up kat akaun GitHub.com .


git config --global user.email "your_email@youremail.com"


Lepas tu kita langkah seterusnya

Masuk ke folder yang disediakan untuk di 'keep track' perubahan yang nak di detect.
Atau sediakan satu folder khusus.

Gunakan command 


git init 


untuk memaklumkan ini adalah local repositori yang mana sebarang prubahan yang dibuat akan disimpan dalam github


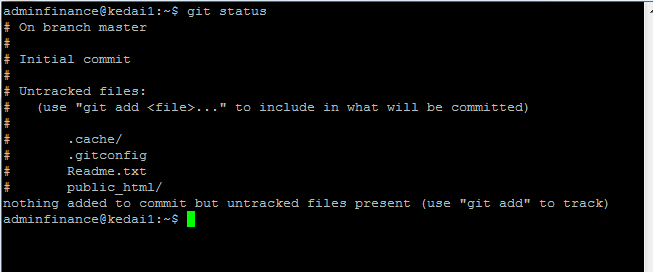
Apakah status git,gunakan command


git status


lah skang kita lihat status git yg dh dibuat tadi.


Sekarang masanya untuk masukan file dan folder kedalam local repository,aku suka add semua ... bukan apa takut terlupa so command aku biasanya

git add  *

atau korang boleh masukan satu satu fail

git add Readme.txt

Kemudian commit dan masukan maklumat atau teks yang memberi pengenalan terhadap perubahan yang dibuat.

git commit -m "Bismillahirahmanirahim ... Mulakan Projek"

Untuk push local repository ke github.com

git remote add origin https://github.com/jamalparit/laravel.git


git push -u origin master

GITHub - Pengenalan

Apa itu GITHub

Selalu selalunya bila kita buat sesuatu yang memerlukan duplikasi, kita akan copy file dan letakan filename.
Biasanya kita bubuh tarikh atau bilangan nombor. Cth:-

Ini akan memakan space dan masa untuk mencari dan membuat perubahan. Kalau dalam office autmation pun dah features yg keep track any changes yang kita buat perubahan pada sesuatu dokumen. Akan tetapi terdapat masalah bila ianya melibat dokumen yang banyak dan orang yang ramai terlibat dalam penyediaan dokumen.

Inilah yang berlaku dalam pekerjaan aku ni. Huh letih tul la. So hari ini nak try GitHub dah selalu dengar tapi tidak pernah mencuba. So inilah dia

Bila kita guna

Dimana nak dapat

Cara Installasi

First Time Guna

Saturday, June 22, 2013

Configure Static Route For Windows 7 , Using 2 Gateway in 1 PC

For Windows 7 , You need to run command prompt as Administrator !!!
A. The Windows IP subsystem uses IP configuration information (e.g., subnets, gateways) to automatically create a routing table that dictates how the OS will send IP packets to other host systems.
To view the routing table on your system, open a command prompt and type
route print
You'll see a routing table similar to the following sample table:
=======================================================================
Interface List
0x1 ........................... MS TCP Loopback interface
0x2 ...00 10 a4 8b 4b 8e ...... Intel(R) PRO/100+ MiniPCI - Packet Scheduler Miniport
0x4 ...44 45 53 54 42 00 ...... Nortel IPSECSHM Adapter - Packet Scheduler Miniport
0x20003 ...00 04 5a 0c 96 db ...... Instant Wireless - Network PC CARD #2 - Packet Scheduler Miniport
=======================================================================
=======================================================================
Active Routes:
Network Destination     Netmask       Gateway     Interface Metric
        0.0.0.0         0.0.0.0   192.168.1.1 192.168.1.100     30
      127.0.0.0       255.0.0.0     127.0.0.1     127.0.0.1     1
    192.168.1.0   255.255.255.0 192.168.1.100 192.168.1.100     30
  192.168.1.100 255.255.255.255     127.0.0.1     127.0.0.1     30
  192.168.1.255 255.255.255.255 192.168.1.100 192.168.1.100     30
      224.0.0.0       240.0.0.0 192.168.1.100 192.168.1.100     30
255.255.255.255 255.255.255.255 192.168.1.100             2     1
255.255.255.255 255.255.255.255 192.168.1.100 192.168.1.100     1
255.255.255.255 255.255.255.255 192.168.1.100             4     1
Default Gateway:       192.168.1.1
=======================================================================
Persistent Routes:
None
Occasionally, the automatically generated routing table will be inaccurate and you might want to use the Route Add command to force a particular route for some IP traffic. You can obtain information about this command by typing
route /?
at the command prompt, but the basic syntax is
route \[-p\] add mask metric if
For example,
route -p add 0.0.0.0 mask 0.0.0.0 192.168.1.1 metric 1 if 0x20003
This sample command uses the -p option to add a persistent route (i.e., 0.0.0.0) that will still be in place, even after a reboot, to all destinations. This persistent route will use the 192.168.1.1 gateway with the highest priority (i.e., metric 1) on interface 0x20003 (i.e., wireless network). The last piece of this information is the interface. Determining which value to use for the interface can sometimes be confusing. Basically, you use the Interface List value that appears in the first part of the routing table. In the sample table above, the valid values are 0x1, 0x2, 0x4, and 0x20003. Although this information is easy to obtain, the first part of the routing table often scrolls off screen, leaving users unsure of what value to use.

Friday, September 14, 2012

Vmware VM import Failed to open disk scsi0:0: Unsupported and/or invalid disk type 7. Did you forget to import the disk first?Unable to create virtual SCSI device for scsi0:0, Module DevicePowerOn power on failed.


Resolution

This issue occurs if a virtual machine that is meant for VMware Hosted products such as VMware Workstation, VMware Player or VMware Fusion is powered-on on a VMware ESX host.

The underlying format used to store virtual machines on VMware Hosted products differs from the format used to store virtual machines on VMware ESX hosts.

To import a virtual machine stored on a VMware Hosted product to a VMware ESX host, the virtual machine should first be converted using VMware vCenter Converter. For more information on conversion, see the VMware vCenter Converter documentation.
Why this happen to me :
This error comes when thin provisioned VMDK file is imported as new vm from backup, or clone VM.

Solution

Reimport the VM using the "zeroedthick"
How to :-
Connect to the ESX host using an SSH session or ILO/DRAC to use this command.
Go to /vmfs/volumes/yourdatastore/

and then give the following command

vmkfstools -i Ubuntu-server.vmdk -d zeroedthick Ubuntu-server1.vmdk

after that remove Ubuntu-server.vmdk and rename Ubuntu-Server1.vmdk to Ubuntu-Server.vmdk and continue the process of import it will work.

"zeroedthink" a flat file of full size is created. ( not thin provisioned)


Wednesday, June 08, 2011

OpenFiler 2.99

Summary

This is part 1 in a proof of concept serious involving the creation of a RAID 1 iSCSI Target using OpenFiler 2.13 and Vmware Server 2. We will purposely fail one of the virtual disks in the array rebuild the array and verify the data. In part one of the series we will create the Raid 1 array. In subsequent parts we will create an ISCSI Target, connect Windows Vista using iSCSI Initiator and simulate RAID 1 drive failure and recovery. The OpenFiler vmware appliance is free to download and use. The installation of both Vmware Server 2 and OpenFiler 2.13 vmware appliance will not be covered here.
Create VMware virtual disks

From the VMware Server 2 web administration create two 50 MB disks for the OpenFiler VMware guest accepting the VMware defaults.
Create Raid Partitions

As seen in Figure 1, navigate to openfiler > Volumes > Block Devices and select the first of our newly created disks /dev/sdb.

FIGURE 1: opefiler > Volumes > Block Devices


Create a RAID array partition by selecting Partition Type: “RAID array member” for the entire cylinder range (default) and clicking “Create”. See Figure 2. The resulting RAID partition should like as seen in Figure 3. Repeat the previous steps to create a RAID partition for /dev/sdc


FIGURE 2: opefiler > Volumes > Block Devices > /dev/sdb


FIGURE 3: openfiler > Volumes > Block Devices > /dev/sdb


Create New Raid 1 Array

Once the two raid devices have been created navigate to openfiler > Volumes > Software Raid as seen in Figure 4 below. Select RAID-1 from the drop down menu, leave the chunk size at default, select the two raid devices as seen in Figure 4 and click “Add array”. The resulting raid array information will be displayed as seen in Figure 5.

Figure 4: openfiler > Volumes > Software Raid


Figure 5: openfiler > Volumes > Software Raid


Create New Volume Group

Navigate to openfiler > Volumes > Volume Groups and create the new volume group “volgroupraid001”. If this is not your preferred volume group naming convention, change it to your liking. After entering your “Volume group name”, select our newly created Raid 1 volume /dev/md0 and click “Add volume group” as seen in Figure 6. The resulting Volume Group is displayed as seen in Figure 7.

Figure 6: openfile > Volumes > Volume Groups


Figure 7: openfiler > Volumes > Volume Groups


Create New Volume

Navigate to openfiler > Volume>Add Volume select our “volgroupraid001” volume group, enter the name our new volume “volraid001”, fill in a description, enter the Required Space” (32MB) and be sure to select the proper “Filesystem Type” of iSCSI. Click “Create” when ready. See Figure 8 below. The resulting Volume Group will be as seen in Figure 9.

Figure 8: openfiler > Volume > Add Volume

Figure 9: openfiler > Volumes > Manager Volumes


In our next section we will create the OpenFiler iSCSI Target using our newly created RAID 1 volume.

OpenFiler 2.99 - Attempted to Create Software Raid 1 Array - Failed...

Heres the code you need to get RAID1 working on Openfiler 2.99:

You need to type the following commands into the shell.

Code:
conary update mdadm=openfiler.rpath.org@rpl:devel/2.6.4-0.2-1

This will install the correct mdadm files, once installed type the next command in.

Code:
ln -s /sbin/lvm /usr/sbin/lvm

This ensures that the GUI is populated correctly.
This will then allow you to create all of the software RAID types without issue.

I extracted this info from here: http://www.everything-virtual.com/?p=349

Friday, April 01, 2011

Dionea - Honeypot

Copy N Paste from
http://networkdefense.com.au/2010/06/12/first-experiences-with-dionaea/
After a lot of reading, a few very late nights, and a fair bit of indecision I decided to install Dionaea. It was down to mwcollectd or Dionaea as my next choice for a 30 day test, but I had quite a few issues getting mwcollectd running properly. I think this is mostly due to my lack of experience compiling stuff in linux, and also not understanding what to do when things fail or don't compile as expected. So I moved on and began to follow Markus' extensive Dionaea install documentation.

My first few attempts failed, in epic fashion. Initially for some unknown reason I decided to install Python 3 from testing... even though the documentation says to compile it. This brought up issues with sqlite3, again frustrating but a good learning experience. Follow the doco! In the end I had to make a slight modification to the ./configure script when compiling Dionaea, as Cython was not being found. Other than that the install was very smooth. I installed Dionaea under Debian 64bit, chose KDE graphical install and left the 'Standard System' and 'Desktop Environment' options checked.

I thought it would be a good idea to post the steps I took to install Dionaea, not sure if it is of use to anyone else. It's basically just a rehash of Markus' documentation.

1. Stuff from APT
apt-get install libglib2.0-dev libssl-dev libcurl4-openssl-dev libreadline-dev libsqlite3-dev python-dev libtool automake autoconf build-essential subversion git-core flex bison pkg-config

2. gettext / glib
apt-get install gettext
wget http://ftp.gnome.org/pub/gnome/sources/glib/2.20/glib-2.20.4.tar.bz2
tar xfj glib-2.20.4.tar.bz2
rm glib-2.20.4.tar.bz2
cd glib-2.20.4/
./configure --prefix=/opt/dionaea
make
make install
cd ..

3. liblcfg
git clone git://git.carnivore.it/liblcfg.git liblcfg
cd liblcfg/code
autoreconf -vi
./configure --prefix=/opt/dionaea
make install
cd /usr/local/src

4. libemu
git clone git://git.carnivore.it/libemu.git libemu
cd libemu
autoreconf -vi
./configure --prefix=/opt/dionaea
make install
cd ..

5. libnl (optional)
git clone git://git.kernel.org/pub/scm/libs/netlink/libnl.git
cd libnl
autoreconf -vi
export LDFLAGS=-Wl,-rpath,/opt/dionaea/lib
./configure --prefix=/opt/dionaea
make
make install
cd ..

6. libev
wget http://dist.schmorp.de/libev/Attic/libev-3.9.tar.gz
tar xfz libev-3.9.tar.gz
rm libev-3.9.tar.gz
cd libev-3.9
./configure --prefix=/opt/dionaea
make install
cd ..

7. Cython
wget http://cython.org/release/Cython-0.12.1.tar.gz
tar xfz Cython-0.12.1.tar.gz
rm Cython-0.12.1.tar.gz
cd Cython-0.12.1
python setup.py build
python setup.py install

8. sqlite3
apt-get install sqlite3

9. Python 3.1.2
wget http://python.org/ftp/python/3.1.2/Python-3.1.2.tgz
tar xfz Python-3.1.2.tgz
rm Python-3.1.2.tgz
cd Python-3.1.2/
./configure --enable-shared --prefix=/opt/dionaea --with-computed-gotos \
--enable-ipv6 LDFLAGS="-Wl,-rpath=/opt/dionaea/lib/"
make
make install
cd ..

10. libxml2-dev
apt-get install libxml2-dev

11. libxslt1-dev
aptitude install libxslt1-dev

12. lxml
wget http://codespeak.net/lxml/lxml-2.2.6.tgz
tar xfz lxml-2.2.6.tgz
rm lxml-2.2.6.tgz
cd lxml-2.2.6
/opt/dionaea/bin/2to3 -w src/lxml/html/_diffcommand.py
/opt/dionaea/bin/2to3 -w src/lxml/html/_html5builder.py
/opt/dionaea/bin/python3 setup.py build
/opt/dionaea/bin/python3 setup.py install
cd ..

13. udns
wget http://www.corpit.ru/mjt/udns/udns_0.0.9.tar.gz
tar xfz udns_0.0.9.tar.gz
rm udns_0.0.9.tar.gz
cd udns-0.0.9/
./configure
make shared
cp udns.h /opt/dionaea/include/
cp *.so* /opt/dionaea/lib/
cd /opt/dionaea/lib
ln -s libudns.so.0 libudns.so
cd /usr/local/src

14. Curl & C-ares
wget http://c-ares.haxx.se/c-ares-1.7.3.tar.gz
tar xfz c-ares-1.7.3.tar.gz
cd c-ares-1.7.3
./configure --prefix=/opt/dionaea
make
make install
cd ..

wget http://curl.haxx.se/download/curl-7.20.0.tar.bz2
tar xfj curl-7.20.0.tar.bz2
rm curl-7.20.0.tar.bz2
cd curl-7.20.0
./configure --prefix=/opt/dionaea
make
make install
cd ..

15. libpcap
wget http://www.tcpdump.org/release/libpcap-1.1.1.tar.gz
tar xfz libpcap-1.1.1.tar.gz
rm libpcap-1.1.1.tar.gz
cd libpcap-1.1.1
./configure --prefix=/opt/dionaea
make
make install
cd ..

16. Dionaea (with my own changes on the Cython line from '/usr/local/bin' to '/usr/bin')
git clone git://git.carnivore.it/dionaea.git dionaea

cd dionaea
autoreconf -vi

./configure --with-lcfg-include=/opt/dionaea/include/ \
--with-lcfg-lib=/opt/dionaea/lib/ \
--with-python=/opt/dionaea/bin/python3.1 \
--with-cython-dir=/usr/bin \
--with-udns-include=/opt/dionaea/include/ \
--with-udns-lib=/opt/dionaea/lib/ \
--with-emu-include=/opt/dionaea/include/ \
--with-emu-lib=/opt/dionaea/lib/ \
--with-gc-include=/usr/include/gc \
--with-ev-include=/opt/dionaea/include \
--with-ev-lib=/opt/dionaea/lib \
--with-nl-include=/opt/dionaea/include \
--with-nl-lib=/opt/dionaea/lib/ \
--with-curl-config=/opt/dionaea/bin/ \
--with-pcap-include=/opt/dionaea/include \
--with-pcap-lib=/opt/dionaea/lib/ \
--with-glib=/opt/dionaea

make
make install

Running Dionaea
cd /opt/dionaea/bin/
./dionaea -l all,-debug -L '*'

Within moments of launching Dionaea connection attempts began pouring in, mostly rejected attempts. After around 30 minutes the first sample was received along with some interesting colours flying past - looking forward to going through the logs later this evening. Now all that's left to do is get the p0f ihandler turned on. So far things are looking promising.

Getting Dionaea up and running has been a great experience. I've learned a lot about compiling, dependencies, issues, and Debian in general. I'm very keen to see what kind of information it can produce over the coming month.

- Cooper

*update: 27th November 2010 - Updated Dionaea Install Instructions

5 Faedah RTOS Linux Kernel - Apa Itu Sistem Operasi Masa Nyata (RTOS) di Malaysia

Di VIENNA dimana selepas 20 Tahun, Real-Time Linux Akhirnya Masuk ke Dalam Kernel Utama Linux. Itulah pada yang memahami bagaimana berkemban...